Q: How to see your purchase history
A:
See your purchase history in the App Store or iTunes Store
https://support.apple.com/en-us/HT204088
View a list of the apps, songs, movies, TV shows, books, or other items that you bought with your Apple ID.

After you buy content from the App Store, iTunes Store, or make other digital purchases with your Apple ID, you can redownload your purchases on any compatible device. If you want to see a complete list of your purchases in chronological order, you can view your purchase history. In your purchase history, you can do these things:
- View when an order was billed to your account.
- View the date of a purchase.
- Resend email receipts.
- Report a problem with purchased content.

If you’re not currently logged in with the same Apple ID that you use to make purchases in the App Store and iTunes Store, if you’re using a different device, or if you don’t see your purchase, follow the directions below.

You might see subscription payments in this list, but you can’t manage subscriptions from your purchase history. Learn how to view and cancel subscriptions.
See your purchase history

On your iPhone, iPad, or iPod touch

On your iPhone, iPad, or iPod touch
- Go to Settings > [your name] > iTunes & App Store.
- Tap your Apple ID, then tap View Apple ID. You might be asked to sign in with your Apple ID.
If you use Family Sharing, you’ll see in your purchase history what you bought using your Apple ID, but you won’t see what other family members bought. To see what other family members bought, sign in with their Apple ID. - Swipe up to Purchase History and tap it.
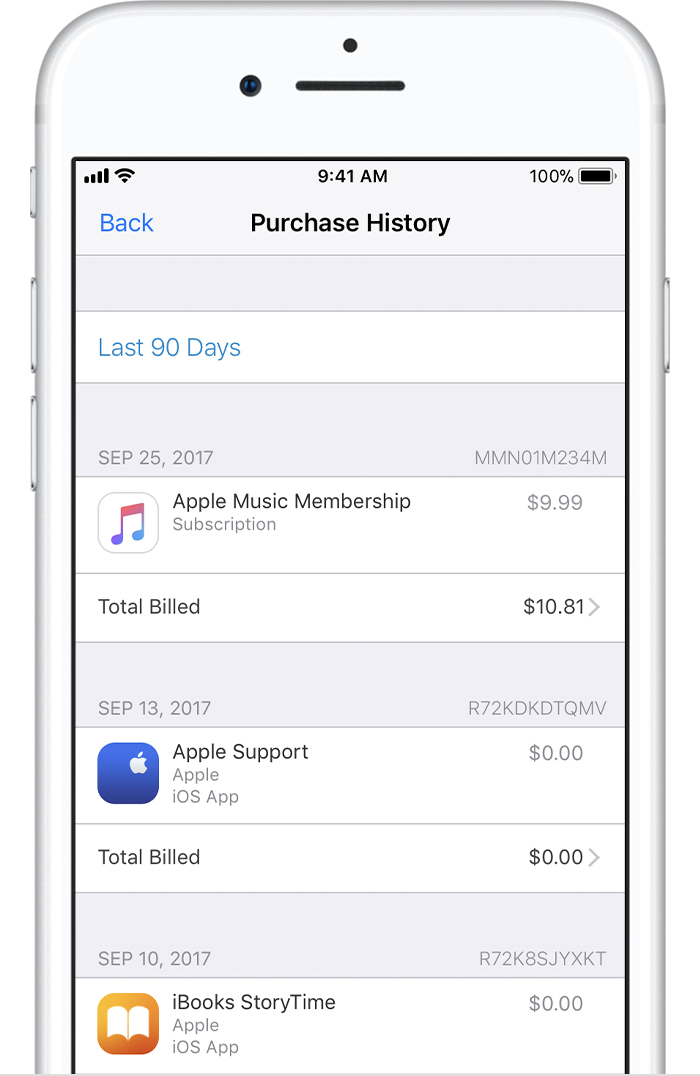
Purchases are grouped by the date that they were charged to the payment method that you have on file. You might see a Pending section at the top of your history; these items haven’t yet charged to your account. By default, only the last 90 days show up in your purchase history. To change the range, tap Last 90 Days at the top of the screen, then select the range that you want to view.
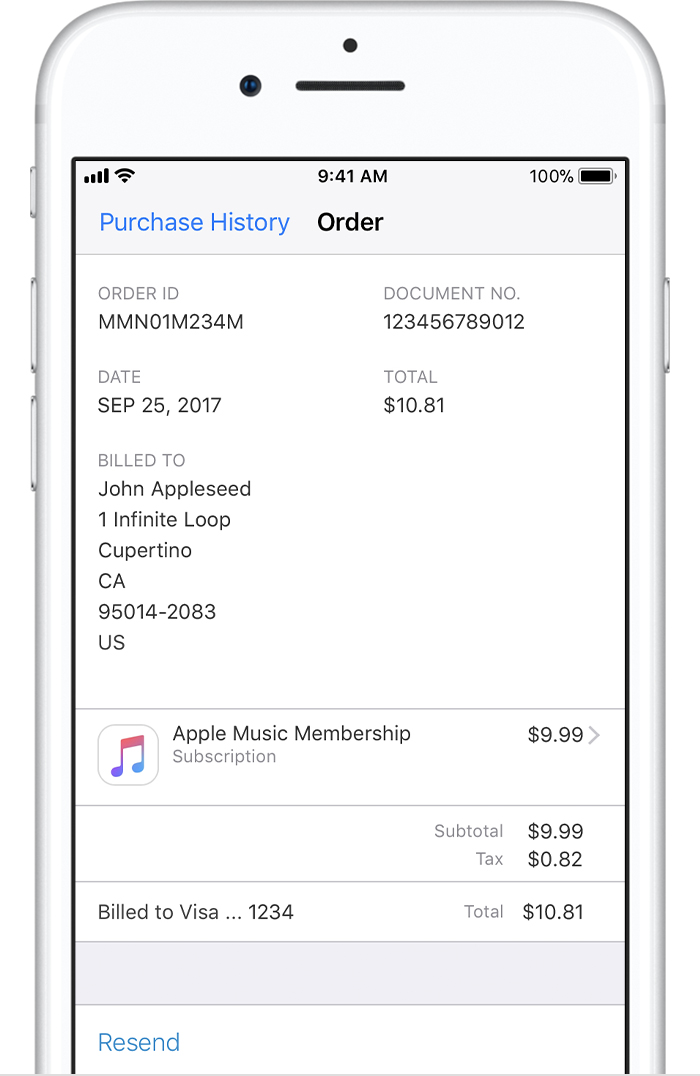
Tap on the > to the right of the total billed charge to see details of an invoice, including the billing date and order ID. If the total charge was more than zero, you can tap Resend at the bottom of the invoice details screen to get a new email receipt.

Tap on an item inside an invoice to see the date that you purchased or downloaded the item, which might be different than the date that you were charged, and the name of the device that you used to purchase it. If you need help with billing for a single item in your purchase history, such as an accidental or duplicate purchase, tap “Report a Problem.”
If you have recurring charges, learn how to change or cancel subscriptions.

On your Mac or PC
- Open iTunes. If you’re not signed in, sign in with your Apple ID.
If you use Family Sharing, you’ll see in your purchase history what you bought using your Apple ID, but you won’t see what other family members bought. To see what other family members bought, sign in with their Apple ID. - From the menu bar at the top of your computer screen or at the top of the iTunes window, choose Account > View My Account.
- Sign in with your Apple ID, then click View Account.
- On the Account Information page, scroll down to Purchase History. To the right of Most Recent Purchase, click See All. It might take a moment for your Purchase History to appear.
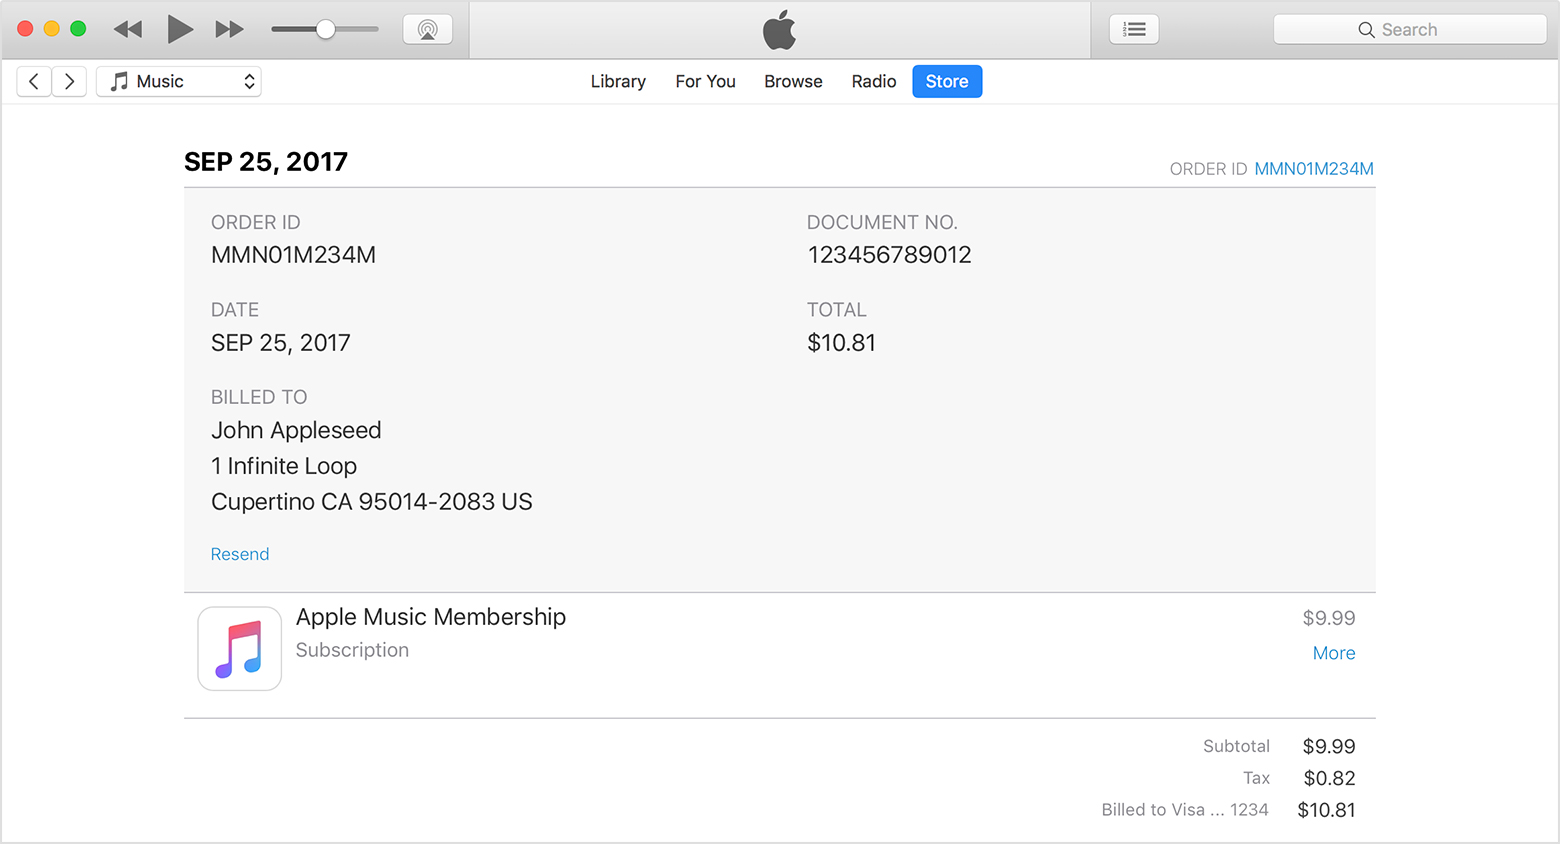
Purchases are grouped by the date that they were charged to the payment method that you have on file. You might see a Pending section at the top of your history; these items haven’t yet charged to your account. By default, only the last 90 days show up in your purchase history. To change the range, click Last 90 Days at the top of the screen, then select the range that you want to view.
Click the Order ID number to the right of the order date to see the details of an invoice, including the billing date. If the total charge was more than zero, you can tap Resend at the bottom of the invoice details section to get a new email receipt.

Click More under the price of the item to see the date that you purchased or downloaded the item, which might be different than the date that you were charged, and the name of the device that you used to purchase it. If you need help with billing for a single item in your purchase history, such as an accidental or duplicate purchase, click “Report a Problem.”
If you have recurring charges, learn how to change or cancel subscriptions.

If you can’t find a purchase, or you see unexpected charges
- If you don’t recognize a purchase, compare your purchase history to your credit or debit card statementbefore contacting Apple.
- If you see charges on your bank statement, but the items aren’t in your purchase history, check to see if you have multiple Apple IDs.
- Learn what to do if you don’t see an in-app purchase in an app, but it’s in your purchase history.
- If you don’t see your purchase, it might be hidden. Learn how to hide apps for your iPhone, iPad, iPod touch, or Mac, and how to hide and unhide music, movies, TV shows, audiobooks, and books.
- Learn how to view and cancel your subscriptions and other recurring charges.

Learn more
- Learn how to pay an unpaid balance in the iTunes Store.
- If you want to learn more about a purchase, or redownload an item, view and download your past purchases.
- If you receive email notifications about your purchases, the email might not be from Apple or reflect actual charges to your account. Learn how to identify legitimate iTunes Store emails.
Store availability and features might vary by country or region.
Information about products not manufactured by Apple, or independent websites not controlled or tested by Apple, is provided without recommendation or endorsement. Apple assumes no responsibility with regard to the selection, performance, or use of third-party websites or products. Apple makes no representations regarding third-party website accuracy or reliability. Risks are inherent in the use of the Internet. Contact the vendor for additional information. Other company and product names may be trademarks of their respective owners.Published Date: June 20, 2018
Q: How to Cancel and Refund Subscription?
A: Firstly, we so apologized for any bad experience and inconvenience this has caused you. We’re sad to see you go. We hope that although you’re cancelling your subscription to LiveCollge, you will still continue to use the free features we offer. Making sure you won’t be billed anytime in the future(Important: if you have already signed up for the free trial, deleting the app doesn’t terminate your subscription and won’t stop it from turning into a paid subscription on the indicated renewal date.) Please first follow the steps below to make sure you won’t get billed automatically anytime in the future.1. Go to your iOS device’s “Settings”2. Tap “iTunes & App Stores “3. Tap your Apple ID at the top4. Select “View Apple ID “5. Tap “Subscriptions” (if there isn’t a “subscriptions” section, it means you haven’t signed up for any subscription ever. No need to worry about getting billed)6. Tap to manage the subscription to the app (if the app is not listed in the “Subscriptions” section, it means you haven’t signed up for the app’s subscription yet. You won’t be billed.)7. Tap “Cancel Trial” or “Cancel Subscription” (if you can’t find either of the two options, it means you have already canceled the auto-renewal of the free trial or the subscription. If you don’t manually resubscribe later, you won’t be billed.) Note: Make sure to cancel your free trial or subscription more than 24 hours before the renewal date, otherwise your subscription might renew. If you haven’t been billed, following the steps and instruction above will make sure that no cost will be incurred anytime in the future. If you have already been billed for an accidental purchase, going through the procedure above will make sure that you won’t be billed again. * Getting a full refund for an accidental purchase* If you didn’t mean to make a purchase in the app but have already been billed, you can get a full refund from Apple. All you need to do is make a phone call to Apple and request Apple to give you a full refund for the accidental purchase. “Purchased by accident” is a very common and good enough reason for requesting a refund. And such requests are usually granted right away during the phone call. In a few days afterwards, the full amount of the money deducted for this purchase would be transferred back to your account. Below are the steps:
- Open https://reportaproblem.apple.com/ ,then sign in to your Apple ID.
- Switch to “Receipts” tab, then find the particular purchase order you want a refund for. Take a note of the order ID (which is a string consisting of 10 or more letters and digits).
- Click the “View Purchase” button for that order
- Click the “Report a Problem” button
- For the type of the problem, select “I didn’t authorise this purchase”
- Click the “iTunes Store Support” button.
- In the opened webpage, select “Talk to Apple Support Now”. If that option is not available, select “Schedule a Call”. Contacting through email is the third option here.8.Explain your case in detail to Apple. Make sure to mention that the purchase was accidental and not meant to. Then, state your request for a refund for it.
Alternatively, you can choose to call Apple directly and request a refund. Below are the steps:
- Open the inbox of your Apple ID email, find the auto-generated invoice message sent by Apple. Take a note of the order ID (this will be later used during the phone call with Apple)
- Find and dial Apple’s support number for your country or region. (this can usually be found at the bottom of the home page of Apple’s official website: www.apple.com)
- During your phone call, when you are asked to choose the subject of your inquiry, select the ones around the line of “iTunes App Store”and “Purchases and Billing”, until you get to an Apple representative.
- Tell Apple that the purchase was accidental and not intended, and state your request for a full refund for it.
Frequently asked questions: Q. why won’t you refund me directly?A. We can’t. We are technically unable to do that. The purchase, or any purchase you make in App Store, happens between you and Apple. It is Apple who charges you a fee, not us. Refunded money need to go back via the original channel, which is Apple’s own billing system. We wish we could directly refund you right away. And we promise that, once Apple makes it possible, we’ll be among the first ones to switch to that route. But for now, the only way to get the refund is to contact Apple. Fortunately, Apple can resolve such refund issues right away during the phone call. One more thing is that requesting a refund never requires our approval. Q. How long does it take to get my money back.A. It depends on your payment method. Normally, it takes 1-3 business days and shouldn’t take more than 10 business days. If you want to learn about the progress, please contact Apple. Q. There’s no invoice email in my inboxA. There might be a delay. Please check you mailbox 24 hours later. Q. I can’t find Apple’s support number:A. click “Support” on the homepage of Apple’s official website. In the opened webpage, click “Phone Numbers” under the “Connect” category. You can also use the link below to get to the relevant webpage directly:https://support.apple.com/kb/HT201232
Comments
0 comments
Please sign in to leave a comment.